request header field DNT not allowed by access-control-allow-headers

On the Mobile Safari browser you can come across the error ‘Request header field DNT is not allowed by access-control-allow-headers’ . We’ll explain how to fix this easily.

When you’re doing an AJAX call to a different server (eg. api.javablog.be) then where the original page was loaded (eg. www.javablog.be); you’re essentially doing a cross domain AJAX call. This is blocked by browser due to security reasons.

To support mashup style websites,  you can include a response header in the HTTP answer the server is sending:

Access-Control-Allow-Origin", "*"

The * means that any domain can send the AJAX call. It’s better to limit it to those domains which are allowed access.

Setting only this parameter is not enough to fix Request header field DNT is not allowed by access-control-allow-headers. 

You’ll also need to set the following headers on the server side HTTP response object:

Access-Control-Allow-Methods = GET, POST, OPTIONS, DELETE
Access-Control-Allow-Headers = DNT,X-Mx-ReqToken,Keep-Alive,User-Agent,X-Requested-With,If-Modified-Since,Cache-Control,Content-Type, Accept-Language, Origin, Accept-Encoding

How you should set the HTTP response parameters depends on your server side technology; here are some helpful links for PHP and JAVA

svn: Error setting property svn ignore

Solving svn ignore problems

When using SVN you can come across the following error when committing your changes:


org.tigris.subversio​n.javahl.ClientExcep​tion: Failed to execute WebDAV PROPPATCH
svn: Commit failed (details follow):
svn: At least one property change failed; repository is unchanged
RA layer request failed
svn: Error setting property 'ignore':
Could not execute PROPPATCH.

With TortoiseSVN you can fix this error by recreating the SVN ignore file.

Here is a detailed list:

  1. Go to your root SVN Repo folder
  2. Choose TortoiseSVN -> Properties
  3. Delete the SVN .ignore file
  4. When you now want to commit the SVN Repo root folder with TortoiseSVN, you’ll see all the directories which you have previously ignored. Here you can add them back to SVN ignore file if needed.

Committing your work to SVN will now work again!

Debugging Weblogic Classloader issues with wls-cat

One of the problems you come across when using Weblogic are Weblogic classloader issues. These can regularly happen because Weblogic itself uses a lot of frameworks, some of which you’re also using in your application EAR/WAR file. Sometimes you want to use a newer version of the library then the one in Weblogic and that’s when the problems start because your library comes later on the classpath.

WLS CAT (Class Loader Analysis Tool)

Fortunately there is a Web app wls-cat available by default in Weblogic (you don’t see it deployed in the Weblogic console though).

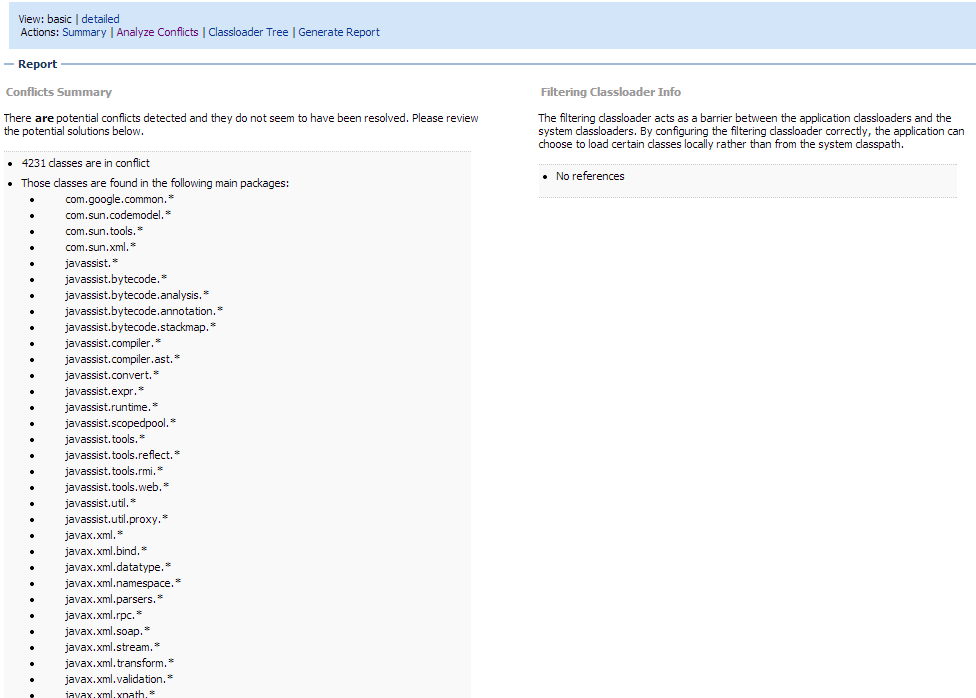
Below you can find a screenshot of wls-cat in action. When you analyze conflicts, the tool will spit-out all classes which are in conflict – eg. more then one version is on the classpath (EAR/WAR classpath + Weblogic classpath), but only one can be loaded in the JVM.

Solve Weblogic classloader issues with wls-cat

Once you have a list of the packages/classes in conflict, you have two options: either you can remove the duplicate jar from your EAR application, or you can instruct Weblogic to choose your version over the one bundled in Weblogic.

The latter option is configured via the META-INF/weblogic-application.xml file in your EAR file:

<prefer-application-packages>
        <package-name>com.google.common.*</package-name>
</prefer-application-packages>

Configuring the options happens on package level. Now the nice thing about wls-cat is, that it also generates a ready-to-use prefer-application-packages xml element so you don’t need to create this list fully by hand by inspecting all the packages inside a conflicting library jar

How to setup Eclipse WLST plugin

The WebLogic Scripting Tool or in short WLST, is a command-line tool that you can use to automate Weblogic server installs and configuration of domains. This post will explain how to setup your Eclipse WLST development environment so you can write the scripts with code completion.

WLST scripting environment

The WLST scripting environment is based on the Java scripting interpreter, Jython. To get access to the WebLogic scripting functions from your Eclipse IDE you’ll have to install the plugins Oracle has made available.

What Does WLST Do?

WLST lets you perform the following tasks:

  • Retrieve and edit domain configuration and runtime information.
  • Automate domain configuration tasks and application deployment.
  • Control and manage the server life cycle.
  • Access the Node Manager and start, stop, and suspend server instances remotely or locally

Eclipse WLST configuration

  1. Install Eclipse Kepler release with the Oracle Enterprise Pack for Eclipse (WTP) from http://download.oracle.com/otn_software/oepe/kepler/wtp/
  2. Create a Weblogic Server runtime via Window -> Show View -> Servers
  3. Click this link to create a new Server
  4. Choose Oracle WebLogic Server 12c (12.1.2)
  5. Enter the following parameters:
    • Weblogic Home: <BEA_HOME>\wlserver
    • Java Home: <JAVA_HOME>
    • Domain: <WEBLOGIC_DOMAIN_DIR>

Verifying Eclipse WLST installation

  1. Create a new Facet Project in Eclipse
  2. Add the Facet Weblogic Scripting Tools (WLST)
  3. Click on Further configuration required, click OK
  4. If you go to Window -> Preferences -> PyDev -> Interpreter Jython, you should now see something similar as below:

weblogic-wlst-interpreter

Solving @inject null pointer exception

Getting a NullPointerException on @Inject ? In this post we’ll post a few possible solutions and things to check, that could explain the @inject null pointer exception.

Make sure your archive (jar, war, …) has a beans.xml file defined

The beans.xml file is known as the bean archive descriptor. Below you can find the most simple example with just a root beans xml element:

<?xml version="1.0" encoding="UTF-8"?>
<beans xmlns="http://java.sun.com/xml/ns/javaee"
   xmlns:xsi="http://www.w3.org/2001/XMLSchema-instance"
   xsi:schemaLocation="
      http://java.sun.com/xml/ns/javaee 
      http://java.sun.com/xml/ns/javaee/beans_1_0.xsd">
</beans>

This file should be placed into META-INF/beans.xml or WEB-INF/beans.xml.
If you don’t include this file in your module archive, CDI injection will not be active for this archive as the container will not scan the archive.

There are a few reasons why the spec was done this way:

  • Performance: The container only has to scan the modules where you’ve added the beans.xml
  • The beans.xml also lets you define interceptors and decorators that have to be executed when the injection takes place.

When using CDI in some places, you have to use it everywhere

In CDI, the container manages the lifecycle of the objects it creates via the @Inject. What this means is that if you bundle a bean with an injected dependency into another object, the other object also has to be managed by CDI. Doing a new OtherObject() will not work; at least the @Inject will not be done.

How to enable Java Web Start log

When you’re debugging a Java Web Start client, it can be useful to get the Java Web Start Log.

This is actually quite easy to accomplish:

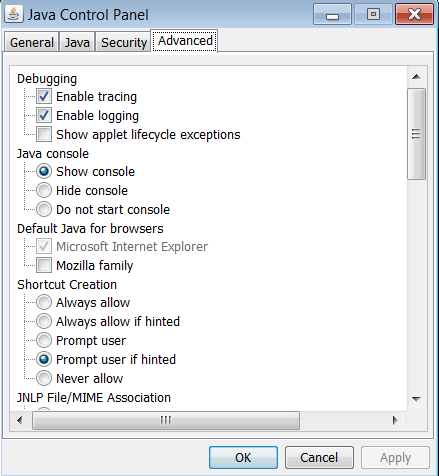
  1. Go to your Java Control Panel (on Windows: Control Panel -> Java)
  2. Click on the tab Advanced
  3. Under the debugging heading, enable Enable Tracing and Enable Logging
  4. Under Java console, choose Show Console

Now you can launch your Java webstart application again by clicking on the JNLP file, and you’ll get the logging in the Java console.

java-web-start-log

Maven version contains expression but should be a constant

In the following example Maven 3 will output a warning Maven version contains expression but should be a constant. This is because we use the expression ${project.parent.version} in the version tag of this Maven module.

<parent>
   <groupId>com.mycompany</groupId>
   <artifactId>myapp</artifactId>
   <version>5.0.0-SNAPSHOT</version>
</parent>

<groupId>com.mycompany</groupId>
<artifactId>myAppEar</artifactId>
<version>${project.parent.version}</version>

So why is Maven complaining about Maven version contains an expression ?

Maven version contains an expression It doesn’t make much sense to make this version non-static, because the maven-release-plugin will automatically update it when doing a release. (eg. when it will change). Make the pom.xml the master of the version tag, not some other file; this will make your life easier when you start eg. using the maven-release-plugin (no need for special configuration)

If you want to use the parent pom version in sub-modules, you can remove it, because the sub-module will automatically inherit the version of the parent if it is ommitted.

Unsupported IClasspathEntry kind=4 when Updating Maven project

When updating a Maven project you can come accross the error Unsupported IClasspathEntry kind=4. This is due to a bug in m2e, which can manifest itself when using the m2e plugin on a project that has generated Eclipse project settings via the Maven maven-eclipse-plugin

Solving Unsupported IClasspathEntry kind=4

Unsupported IClasspathEntry kind=4

  1. Install the latest version of the m2e plugin – which adds Maven functionality into Eclipse.
  2. Disable the maven nature of the project (right-click on the project)
  3. Run mvn eclipse:clean (right click on the project -> Run As -> Maven build .. -> Goals: eclipse:clean)
  4. Re-enable the maven nature by right-clicking on the project and choosing Configure-> Convert to Maven Project
  5. Don’t run maven-eclipse-plugin

How to unit test EJB3 without a container

Unit test EJB3 without a container has become much easier since the EJB 3.1 spec with the introduction of the embeddable EJBContainer concept. An embeddable EJBContainer is a container for enterprise beans that does not require a Java EE server to run.

Interesting usage scenarios are:

  • EJB unit testing: you don’t need to install a JavaEE server for EJB development, unit testing and deployment to the container
  • Lightweight: the embeddable container has a much smaller footprint
  • Fast: starts faster than the full server, because it only initializes EJB-related components

Sample code

Below you can find a simple setup method for a JUnit test that configures the Embeddable EJBContainer.

@Before
public void setup() {
	Properties properties = new Properties();
	properties.setProperty(EJBContainer.MODULES, "myModule");
	properties.put(EJBContainer.PROVIDER, "tomee-embedded");
	Context context = EJBContainer.createEJBContainer().getContext();
}

@After
public void tearDown() throws NamingException {
	ejbContainer.close();
}

Here myModule is the module-name defined in ejb-jar.xml file

So how does the EJBContainer start an embedded EJB container? You’ll need to provide an embedded EJB container on the classpath. Normally all Application servers supporting JavaEE6 have to provide such an embedded EJB container.

Apache TomEE container This example uses Apache TomEE as it provides an easy way to specify the correct dependencies via Maven.

<dependency>
	<groupId>org.apache.openejb</groupId>
	<artifactId>tomee-embedded</artifactId>
	<version>1.5.2</version>
</dependency>            
<dependency>
	<groupId>javax</groupId>
	<artifactId>javaee-api</artifactId>
	<version>6.0</version>
	<scope>provided</scope>
</dependency>

The properties.put(EJBContainer.PROVIDER, “tomee-embedded”) makes sure that we will use Apache TomEE when running the test. (even if there is another provider on the classpath)

Ambiguous dependencies for type problem fix

When trying to @Inject an EJB inside a bean, it is possible that you’ll get an exception about ambiguous dependencies for type on Weblogic:

Oracle WebLogic Logo

Substituted for the exception org.jboss.weld.exceptions.DeploymentException which lacks a String contructor, original message - Exception List with 2 exceptions: Exception 0 : org.jboss.weld.exceptions.DeploymentException: WELD-001409 Ambiguous dependencies for type [ABC] with qualifiers [@Default] at injection point [[field] @Inject private ABCField]. Possible dependencies [[Session bean [class ABCImpl with qualifiers [@Any @Default]; local interfaces are [ABC], Managed Bean [class ABCImpl_7pbnr4_Impl] with qualifiers [@Any @Default]]]\

Solving the Ambiguous dependencies for type problem

The problem is that there are two possible implementations to inject and the CDI container doesn’t know which one to choose. You can also see that there seems to be a proxied/generated class to be listed (in our example ABCImpl_7pbnr4_Impl).

In our case this generated class was created by the Weblogic appc tool which was run on our EAR file. This ear file includes a JAR with EJB 2.x beans and another one with EJB 3.x beans<.

We solved this problem by not letting Weblogic appc being run on our EJB3.x jar. You can do this by running the Weblogic appc on individual jar files instead of the ear file. As you probably know EJB3 style beans don’t need an ejb compiler anymore to generate the remote and local interfaces as everything can be done with annotations.

PS: Weblogic uses Weld, the reference implementation of  Contexts and Dependency Injection in JavaEE.